Knowledgebase
  • Welcome!
  • Threats
    • Software
      • Malware
      • Ransomware
      • Macros
    • Hardware
      • Flipper Zero
        • Firmware
          • 🐬flipperzero
            • Getting Started
          • 🐬flipper-xtreme
            • Wiki
              • Key Combos
              • Generic Guides
              • iButton key file format
              • SubGhz
              • How to add new SubGHz frequencies
              • Sub-GHz Remote
              • LF RFID key file format
              • NFC Flipper File Formats
              • Infrared Flipper File Formats
              • BadKB
              • Asset Packs
              • Unit tests
              • OTA Updates
              • How To Build
              • Hardware Targets
              • Flipper Build Tool
              • FAP (Flipper Application Package)
              • Flipper Application Manifests (.fam)
          • 🐬roguemaster
          • 🐬unleashed
    • Human
      • Advanced Persistent Threats (APTs)
      • Social engineering
      • Phishing
      • Typosquatting
    • Disinformation
      • Black Propaganda
      • White Propaganda
      • Grey Propaganda
      • Info Warfare
      • Political Warfare
      • Astroturfing
      • Greenwashing
      • Bluewashing
      • Whisper Campaigns
      • Push Polling
      • "Joe Jobs"
      • False Flags
      • Deep Fakes
  • About
    • Ports
      • 20
      • 21
      • 22
      • 23
      • 25
      • 587
      • 2323
      • 53
      • 80
      • 194
  • Tools
    • Radio Frequency & SubGHZ
      • gnuradio
      • hackrf
    • Digital Forensics
      • afflib
    • Reverse Engineering
      • binwalk
      • radare2
    • Hardware & Virtualization
      • qemu
      • freerdp2
      • util-linux
      • lvm2
    • VPN Providers
      • ProtonVPN
      • NordVPN
      • ExpressVPN
      • Surfshark
      • CyberGhost
      • Private Internet Access
    • Database, Cloud, & Firewalls
      • sqlmap
      • cewl
      • gobuster
      • fwbuilder
      • clamav
    • Enumeration & Lists
      • crunch
      • aflplusplus
      • ffuf
      • maltego
        • maltego-teeth
      • getallurls
    • Penetration Testing
      • beef-xss
      • wifite
      • burpsuite
      • metasploit-framework
    • Passwords & Auth
      • john
      • hashcat
      • hydra
      • cryptsetup
    • Surface Intelligence
      • theharvester
      • subfinder
      • dsniff
      • dnsrecon
      • dirb
      • nikto
      • legion
      • spiderfoot
    • Networks & Wireless
      • nmap
      • impacket-scripts
      • tcpdump
      • traceroute
      • wireshark
      • responder
      • aircrack-ng
      • netcat
      • kismet
      • ubertooth
      • routersploit
      • apache2
      • ettercap
      • bettercap
      • bettercap-ui
      • freeradius
      • bind9
      • samba
      • net-snmp
      • tcpreplay
    • Social Media
      • sherlock
    • Miscellaneous
      • git
      • libnfc
      • llvm-defaults
  • Operating Systems
    • Ubuntu
      • Installation
        • Switching
          • From Windows
          • From macOS
          • From a different Linux
        • Applications
        • Ubuntu PreInstalled
    • Linux Mint
      • Installation Guide
        • Verify your ISO image
        • Choose the right edition
        • Boot Linux Mint
        • Create the bootable media
        • Install Linux Mint
        • Hardware drivers
        • Language support
        • EFI
        • Multimedia codecs
        • System snapshots
        • Pre-installing Linux Mint (OEM Installation)
        • Where to find help
        • Boot options
        • Partitioning
        • Multi-boot
      • User Guide
        • Grub Boot Menu
        • Snap Store
        • Chromium
        • Bluetooth
        • Windows ISOs and multiboot USB
        • How to upgrade to Linux Mint 20
        • Edge ISO Images
        • Lost Password
        • Upgrades
        • Printers and Scanners
        • How to upgrade to Linux Mint 21
      • Troubleshooting Guide
        • Expectation
        • Responsibility
        • Change
        • Reproducibility
        • Observation
        • Environment
        • What
        • When
        • Why
        • Errors
        • Where
        • How
      • Translation Guide
        • Using Launchpad
        • Verify your translations
        • Localization
      • Developer Guide
        • Getting Started
          • Setup
          • Technology
        • Mint Tools
        • Cinnamon
        • XApps
        • Development
          • Daily Builds
          • Coding Guidelines
          • Optimizing JS with Cinnamon
          • Building
    • Kali Linux
      • Installation
        • Installing Kali Linux
        • Bare-bones Kali
        • Installing Kali on Mac Hardware
        • Dual Booting Kali with Linux
        • Making a Kali Bootable USB Drive
        • Dual Booting Kali with macOS/OS X
        • Dual Booting Kali with Windows
        • BTRFS Install (Kali Unkaputtbar)
        • Deploying Kali over Network PXE/iPXE Install
      • Virtualization
        • Running Kali Linux as a Virtual Machine in Windows
        • Installing VMware on Apple Silicon (M1/M2) Macs (Host)
        • Customizing a Kali Vagrant Vagrantfile
        • Kali inside Proxmox (Guest VM)
        • Installing VMware on Kali (Host)
        • Installing VirtualBox on Kali (Host)
        • Import Pre-Made Kali VMware VM
        • Kali inside Parallels (Guest VM)
        • Kali inside Vagrant (Guest VM)
        • Kali inside VMware (Guest VM)
        • Kali inside VirtualBox (Guest VM)
        • Import Pre-Made Kali VirtualBox VM
        • Kali inside Hyper-V (Guest VM)
        • Kali inside UTM (Guest VM)
        • Kali inside QEMU/LibVirt with virt-manager (Guest VM)
        • Improving Virtual Machine Performance for VMware
        • Installing VMware Tools (Guest Tools)
        • Installing VirtualBox Guest Addition (Guest Tools)
        • Installing Hyper-V Enhanced Session Mode (Guest Tools)
        • Converting VMX to an OVA
      • USB
        • Making a Kali Bootable USB Drive (Linux)
        • Making a Kali Bootable USB Drive (macOS/OS X)
        • Updating Kali Linux on USB
        • Making a Kali Bootable USB Drive on Windows
        • Standalone Kali Linux 2021.4 Installation on a USB Drive, Fully Encrypted
        • Adding Persistence to a Kali Linux Live USB Drive
        • Adding Encrypted Persistence to a Kali Linux Live USB Drive
        • USB Boot in VirtualBox
        • USB Boot in VMware
      • Kali On ARM
        • BeagleBone Black
        • Acer Tegra Chromebook 13" (Nyan)
        • ASUS Chromebook Flip (Veyron)
        • Banana Pro
        • Banana Pi
        • CubieBoard2
        • CuBox-i4Pro
        • CubieTruck (CubieBoard3)
        • Gateworks Newport
        • CuBox
        • Gateworks Ventana
        • NanoPi NEO Plus2
        • NanoPi2
        • Mini-X
        • NanoPC-T3
        • ODROID-C0/C1/C1+
        • ODROID-XU3
        • ODROID-U2/U3
        • ODROID-C2
        • Pinebook
      • Containers
        • Kali Linux LXC/LXD Images
        • Official Kali Linux Docker Images
        • Installing Docker on Kali Linux
        • Using Kali Linux Docker Images
        • Using Kali Linux Podman Images
      • WSL
        • Win-KeX SL
        • Win-KeX ESM
        • Preparing a system for WSL
        • Win-KeX
        • Win-KeX Win
      • Cloud
        • Digital Ocean
        • AWS
        • Azure
        • Linode
      • Kali NetHunter
        • Installing NetHunter On the OnePlus 7
        • Installing NetHunter On the Gemini PDA
        • Installing NetHunter
        • Installing NetHunter On the TicWatch Pro 3
        • Installing NetHunter On the TicWatch Pro
        • NetHunter Application - Terminal
        • NetHunter BadUSB Attack
        • NetHunter Bluetooth-Arsenal
        • NetHunter Chroot Manager
        • NetHunter Components
        • NetHunter Custom Commands
        • NetHunter Home Screen
        • NetHunter DuckHunter Attacks
        • NetHunter HID Keyboard Attacks
        • NetHunter Exploit Database SearchSploit
        • NetHunter Kali Services
        • NetHunter MAC Changer
        • NetHunter MANA Evil Access Point
        • NetHunter Man In The Middle Framework
        • NetHunter KeX Manager
      • Tools
        • Installing Tor Browser on Kali Linux
        • Kali Tools
        • Installing snapd on Kali Linux
        • Metasploit Framework
        • Installing Flatpak on Kali Linux
        • Submitting tools to Kali
        • Removed Tools From Kali
      • Troubleshooting
        • Discovering Problems With Download Speed
        • Common Cloud Based Setup Information
        • The Basics of Troubleshooting
        • Troubleshooting Installations Failures
        • Troubleshooting Wireless Drivers
        • Minimum Install Setup Information
      • Kali Development
        • Contributing run-time tests with autopkgtest
        • Custom CuBox Image
        • Custom Beaglebone Black Image
        • Custom EfikaMX Image
        • Custom Chromebook Image
        • Custom MK/SS808 Image
        • Custom Raspberry Pi Image
        • Custom ODROID X2 U2 Image
        • Setting up a system for packaging
        • Intermediate packaging step-by-step example
        • Introduction to packaging step-by-step example
        • Getting the best out of the Kali Bot
        • Advanced Packaging Step-By-Step Example (FinalRecon & Python-icmplib)
        • Generate an Updated Kali ISO
        • Creating A Custom Kali ISO
        • Building Custom Kali ISOs
        • Rebuilding a Source Package
        • Recompiling the Kali Linux Kernel
        • ARM Build Scripts
        • Preparing a Kali Linux ARM chroot
    • Arch Linux
      • Installation Guide
      • Frequently Asked Questions
      • General Recommendations
      • Applications
        • Office & Docs
        • Internet
        • Multimedia
        • Science
        • Security
        • Utilities
        • Others
      • Arch compared to other distributions
    • NetBSD
      • Calls and Errors
      • Libraries
      • Lua Modules
      • Devices and Drivers
  • Law, Policy, and Ethics
    • Fair Use
    • DMCA
      • 🗄️Notable Cases
        • MGM Studios Inc. v. Grokster, Ltd.
        • Viacom International, Inc v YouTube, Inc
        • Capitol Records, Inc. v. Thomas-Rasset
        • Perfect 10, Inc. v. Amazon.com
        • Recording Industry Association of America (RIAA) v. Diamond Multimedia Systems, Inc.
        • A&M Records, Inc. v. Napster, Inc.
        • BMG Music v. Gonzalez
        • Sony Computer Entertainment America (SCEA) v. Connectix Corp.
        • Columbia Pictures Industries, Inc. v. Fung
        • Warner Bros. Entertainment Inc. v. RDR Books
        • BMG Music v. John Doe
        • Universal Music Group v. Veoh Networks, Inc.
        • Universal Music Group v. MySpace, Inc.
        • UMG Recordings, Inc. v. MP3.com, Inc.
        • Cartoon Network LP v. CSC Holdings, Inc.
        • Metro-Goldwyn-Mayer Studios Inc. v. Grokster, Ltd.
        • Viacom International Inc. v. Google Inc.
        • Tiffany (NJ) Inc. v. eBay Inc.
        • Perfect 10, Inc. v. Visa International Service Association
        • Universal City Studios Productions LLLP v. Reimerdes
        • Recording Industry Association of America (RIAA) v. Lime Group LLC
        • Sony BMG Music Entertainment v. Tenenbaum
        • Viacom International Inc. v. Time Warner Cable Inc.
        • UMG Recordings, Inc. v. Shelter Capital Partners LLC
        • Sony Computer Entertainment America Inc. v. Bleem LLC
        • Universal City Studios, Inc. v. Corley
        • Ticketmaster Corp. v. Tickets.com, Inc.
        • Authors Guild, Inc. v. Google, Inc.
        • Perfect 10, Inc. v. Cybernet Ventures, Inc.
        • Tiffany (NJ) Inc. v. Ningbo Beyond Home Textile Co., Ltd.
        • Google Inc. v. American Blind & Wallpaper Factory, Inc.
        • Columbia Pictures Industries, Inc. v. Redd Horne, Inc.
Powered by GitBook
On this page
  • Intro
  • How to install Asset Packs?
  • How do I make an Asset Pack?

Was this helpful?

Edit on GitHub
  1. Threats
  2. Hardware
  3. Flipper Zero
  4. Firmware
  5. flipper-xtreme
  6. Wiki

Asset Packs

Intro

Asset Packs are an exclusive feature of Xtreme Firmware that allows you to load custom Animation and Icon sets without recompiling the firmware or messing with manifest.txt files (as a user). Here you can find info on how to install Asset Packs and also how to make your own.

How to install Asset Packs?

Installing Asset Packs is quite easy and straightforward. First, make sure you're on an updated version of XFW before you begin, Asset Packs were added in v40! Then, find some packs to install (we have a channel in our discord where you can find some) or make your own (see below). Once you have some packs to install:

  • Open qFlipper and navigate to SD Card and into dolphin_custom; if you do not see this folder, try reinstalling the firmware, or create it yourself.

  • Here (SD/dolphin_custom) is where all Asset Packs are stored. Simply unzip your packs and upload the folders here.

    If you did this correctly, you should see SD/dolphin_custom/PackName/Anims and/or SD/dolphin_custom/PackName/Icons.

  • Now simply open the Xtreme Settings app (from the home screen press Arrow UP and then Xtreme Settings) and select the asset pack you want. When you back out, Flipper will restart and your animations and icons will use the ones from the selected pack!

How do I make an Asset Pack?

Before we begin, it's better to understand a little on how they work. Asset Packs are made of 2 parts: Anims and Icons.

Animations

Animations use the standard and already well documented animation format, so this will be just a quick recap with the key differences mentioned.

The basic animation structure is:

SD/
 |-dolphin_custom/
                |-PackName/
                         |-Icons/
                               |...
                         |-Anims/
                               |-ExampleAnim/
                                           |-frame_0.bm
                                           |-frame_1.bm
                                           |...
                                           |-meta.txt
                               |-AlsoExample/
                                           |-frame_0.bm
                                           |-frame_1.bm
                                           |...
                                           |-meta.txt
                               |...
                               |-manifest.txt

ExampleAnim and AlsoExample are the individual animations, they contain the animation frames compiled as frame_x.bm (this is a special format Flipper uses, it can't understand .png but only raw pixel data which is what .bm is). Each animation has its own meta.txt, which contains information such as image width and height, frame rate, duration and so on. Next to all the animations you have manifest.txt which tells Flipper when and how to show each animation with values like level and butthurt (mood) constraints and weight (random chance weight).

Again, this is all fairly standard Flipper animation stuff, there are plenty of tutorials on YouTube. The key differences with the Asset Pack animation system are:

  • They go in SD/dolphin_custom/PackName/Anims instead of SD/dolphin.

  • XFW has up to level 30, so make sure to update your manifest.txt accordingly!

Icons

With icons there are quite a few differences and issues we had to solve. In particular, they are usually compiled along with the firmware, so loading them dynamically required a special system. Also, for the same reason, some metadata for the icons now has to be stored along with them, since it's not in the firmware itself. And finally, icons can both be static and animated, both with different solutions to the above problems.

Static icons

The .bm format does not include image width and height, with animations that is stored in meta.txt, so for static icons we made a special format: .bmx, which is [ int32 width ] + [ int32 height ] + [ standard .bm pixel data ], but this is handled by the packer (see below) so don't worry abou it.

Animated icons

Animated icons are structured similarly to animations, but are used like icons. They live next to other static icons, but are stored as .bm sequences. To avoid storing redundant data with .bmx, we kept the frames as .bm and instead opted for a meta file (no extension), which consists of [ int32 width ] + [ int32 height ] + [ int32 frame_rate ] + [ int32 frame_count ], but once again don't fret as this is handled by the packer (see below).

Structure

Other than those few differences above, we kept the same icon naming scheme and structure, so this should look familiar otherwise.

The basic icon structure is:

SD/
 |-dolphin_custom/
                |-PackName/
                         |-Anims/
                               |...
                         |-Icons/
                               |-Animations/
                                          |-Levelup_128x64/
                                                         |-frame_0.bm
                                                         |-frame_1.bm
                                                         |...
                                                         |-meta
                                          |...
                               |-Passport/
                                        |-passport_happy_46x49.bmx
                                        |-passport_DB.bmx
                                        |...
                               |-RFID/
                                    |-RFIDDolphinReceive_97x61.bmx
                                    |-RFIDDolphinSend_97x61.bmx
                                    |...
                               |...

Which is the same you can find in the firmware source code, in assets/icons. The key differences/things to remember with the Asset Pack icon system are:

  • Not all icons are supported (see below).

  • The pixel numbers in the filename are ignored, they are there purely because of the original Flipper icon names and for a hint as to how you should size your icons, but they are not enforced.

  • We kept the original naming scheme and file structure for compatibility, but the original setup is quite bad, so bear with us. Some icons in subfolders (like SubGhz/Scanning_123x52) are used in other unrelated apps/places.

  • Some icons in the official firmware have different versions with different numbers to indicate the flipper level they target. Since our system has so many levels, we decided to keep it simple and remove the level progression from icons. For example Passport/passport_happy1_46x49 becomes Passport/passport_happy_46x49 and Animations/Levelup1_128x64 becomes Animations/Levelup_128x64.

  • The Passport/passport_DB is the background for the passport page, it doesn't mention a pixel size because it should be the same as the Flipper screen size (128x64).

Here are all the icons this system currently supports:

Icons/
    |-Animations/
               |-Levelup_128x64/
                              |-frame_0.bm
                              |...
                              |-meta
    |-BLE/
        |-BLE_Pairing_128x64.bmx
    |-Dolphin/
            |-DolphinCommon_56x48.bmx
    |-iButton/
            |-DolphinMafia_115x62.bmx
            |-DolphinNice_96x59.bmx
            |-DolphinWait_61x59.bmx
            |-iButtonDolphinVerySuccess_108x52.bmx
    |-Infrared/
             |-DolphinReadingSuccess_59x63.bmx
    |-NFC/
        |-NFC_dolphin_emulation_47x61.bmx
    |-Passport/
             |-passport_bad_46x49.bmx
             |-passport_DB.bmx
             |-passport_happy_46x49.bmx
             |-passport_okay_46x49.bmx
    |-RFID/
         |-RFIDDolphinReceive_97x61.bmx
         |-RFIDDolphinSend_97x61.bmx
         |-RFIDDolphinSuccess_108x57.bmx
    |-Settings/
             |-Cry_dolph_55x52.bmx
    |-SubGhz/
           |-Scanning_123x52.bmx
    |-U2F/
        |-Auth_62x31.bmx
        |-Connect_me_62x31.bmx
        |-Connected_62x31.bmx
        |-Error_62x31.bmx

Cool, I read all that, but how do I make one???

All the .bm and .bmx struggles are dealt with by the packer system, which is in scripts/asset_packer.py; when making your Asset Pack you will only be working with .png images and meta.txt/manifest.txt/frame_rate files. As explained above, packs are made of 2 parts, Anims and Icons, but you don't have to include both - if you only include Anims, then the default SFW Icons will be used, and viceversa. You have 2 options: make standalone Asset Packs (recommended), or build them along with the firmware.

Standalone Asset Packs

  • (First time only) Install Python (3.10 recommended, but not required), then open a terminal/console and run pip3 install Pillow heatshrink2.

  • Make a NEW folder anywhere on your system where you'll put all your source asset packs. If you're not sure, the Desktop is always a good place, so make the NEW folder there.

  • Inside the NEW folder make ANOTHER folder with the name of your Asset Pack (less than 32 characters). Inside THAT one, make the Anims and/or Icons folders.

    If you used the desktop, you should have Desktop/AssetPacks/PackName/Anims and/or Desktop/AssetPacks/PackName/Icons.

  • Fill those folders appropriately, referring to the information and structure above, BUT:

    • Images should ALL be .png.

    • For animations you add manifest.txt and meta.txt files.

    • For animated icons you add frame_rate files.

    • Static icons don't need extra configuration.

    • NOTE THAT THIS IS ALL JUST LIKE IN OFFICIAL FIRMWARE, YOU'RE JUST DOING IT IN ANOTHER FOLDER.

    Here is an example of what it should look like:
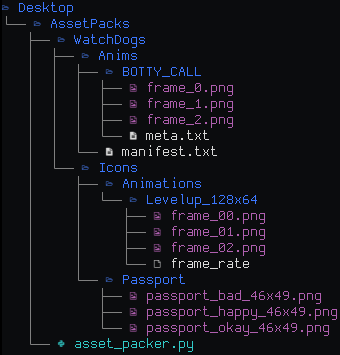
  • Copy the scripts/asset_packer.py file into your source packs folder, right next to your asset packs.

  • Run the asset_packer.py script. You might be able to double click it, if not run in console with python asset_packer.py.

  • It will explain and ask for confirmation, so press Enter.

  • When it's done (it's usually quite quick) you will have a dolphin_custom folder right next to your source packs. Inside it you will see your Asset Pack, but in compiled form (.png images swapped for .bm and .bmx).

  • Now upload the packed packs from that folder onto your flipper in SD/dolphin_custom.

  • Done! Just select it from the Xtreme Settings app now. And if you're generous share your (packed) asset pack in #asset-packs on discord.

Building with Firmware

  • Follow the steps above, but use assets/dolphin/custom as your source packs folder.

  • Packing is integrated with fbt, so just run ./fbt flash_usb_full or ./fbt updater_package to compile the firmware, pack the packs and update your Flipper.

PreviousBadKBNextUnit tests

Last updated 2 years ago

Was this helpful?

image
🐬